How to Choose the Best E-Commerce System for Your Business

Starting an e-commerce business can be exciting, but with so many platforms available, it’s easy to feel overwhelmed. So, how do you choose the right one for your business? Whether you’re a solo entrepreneur or a seasoned tech expert, asking yourself these key questions can guide you to the best decision.

1. How Comfortable Are You with Technology?

If you have little to no technical knowledge, a hosted Saas platform like for example Shopify is likely your best option. Shopify takes care of everything—from domain registration to hosting and updates. It wraps you in a warm embrace, just like a caring mother saying, "I've got you covered." It’s the Canadian e-commerce platform that truly lives up to its stereotype of being warm-hearted and helpful.

However, Shopify isn’t the only option for those without tech skills. Competitors like BigCommerce or the German platform Shopware also cater to non-tech-savvy users. But in my experience, Shopify offers a seamless experience that’s hard to beat.

If you’re tech-savvy and comfortable managing servers, updating PHP versions, and installing plugins, a self-hosted and open-source solution solution like WooCommerce—a free extension of WordPress—may be more suited for you. Other platforms like Magento, Pimcore, and even Shopware’s open-source version offer more flexibility but require technical know-how. I’ve personally set up Shopware’s open-source platform, and while it’s powerful, it did require some troubleshooting—perfect for someone who enjoys geeking out over tech.

WooCommerce strikes a great balance between technical flexibility and user-friendliness, making it a solid choice for small to medium-sized businesses.

2. How Much Money Are You Willing to Spend?

Remember that iconic Wu-Tang Clan lyric, "Cash Rules Everything Around Me"? This couldn’t be more true when it comes to e-commerce platforms. While Shopify offers a user-friendly experience, it comes at a price:

  • Basic Shopify Plan: $29/month (2.9% + 30¢ per transaction)
  • Shopify Plan: $79/month (2.6% + 30¢ per transaction)
  • Advanced Shopify Plan: $299/month (2.4% + 30¢ per transaction)

Not only are you paying a monthly fee, but Shopify also takes a percentage of every sale. And that’s just for the base plan. If you want additional features like email marketing with Klaviyo or automated Instagram posts, those come at extra costs—though you can always install my free app for Instagram posting at the link below!

For budget-conscious entrepreneurs, open-source platforms like WooCommerce, Magento, or Pimcore can be cheaper upfront. However, you’ll need to manage the technical side yourself or hire a developer for customizations, which could increase your costs in the long run. As a general rule, the less technical expertise you have, the more you’ll need to pay for a smooth experience.

3. How Much Customization Does Your Shop Need?

If you’re running a simple business with straightforward needs, Shopify is likely your best option. It covers 98% of what most B2C (Business-to-Consumer) shops require—multi-user access, product management, discount creation, and more—all out of the box.

But if your business model requires more complex features, Shopify may fall short without the help of additional plugins or customization. While Shopify allows for some customization, it’s not open-source, so you’re limited to the APIs and endpoints Shopify provides.

If customization is a must for your business, open-source platforms like Magento or Shopware offer far greater flexibility and control.

4. Are You Running a B2C or B2B Business?

For a typical B2C shop, platforms like Shopify, WooCommerce, or BigCommerce will likely cover all your needs. Shopify, in particular, is designed to cater to B2C businesses, making it a strong choice.

If you’re running a B2B (Business-to-Business) shop, however, your needs may be different. You may need features like wholesale pricing, tiered pricing for different customer groups, or restricted product visibility to logged-in clients. In these cases, platforms like Magento or Shopware are more suitable, offering the customization and flexibility necessary for a B2B model.


By asking yourself these key questions—about your technical skills, budget, customization needs, and business model—you can avoid the biggest mistakes when choosing an e-commerce platform. Whether you go with Shopify for ease of use, WooCommerce for flexibility, or a customizable solution like Magento, making an informed decision will set you on the path to success.

Why your website sucks

Why Your Website Sucks!

What separates a good website from a bad one? What makes a good website good, and what makes a terrible website bad? What makes a user stay on some websites longer than on others?

Well, there are a ton of factors for this, but today I’m focusing on the topic of page speed.

I’ve been in this web development game for quite a while now, and I’ve seen a lot of stuff, okay? I’ve seen websites with overwhelmingly good design, I’ve seen websites that are minimalistic down to the last pixel, and I’ve seen a bunch of mediocre websites that I completely forgot about as soon as I closed the tab.

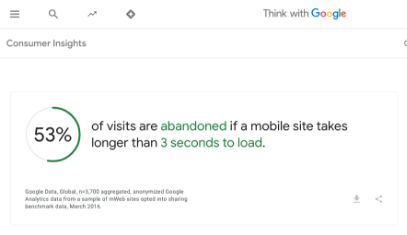
But the worst pages are the ones that take too long to load. Google data shows that 53% of visits are abandoned if a mobile site takes longer than 3 seconds to load.

https://www.thinkwithgoogle.com/consumer-insights/consumer-trends/mobile-site-load-time-statistics/

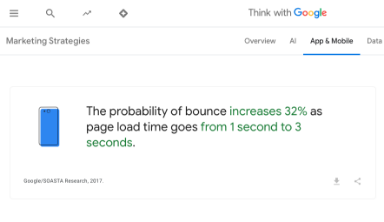
Furthermore, the probability of bounce increases by 32% with every additional second of load time.

https://www.thinkwithgoogle.com/marketing-strategies/app-and-mobile/page-load-time-statistics/

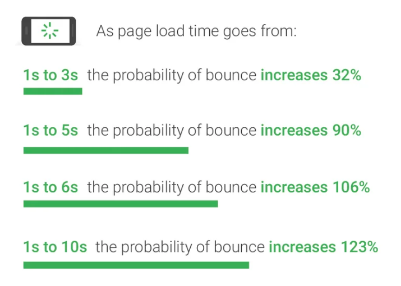
The probability of bounce just gets increasingly worse the longer a page takes to load, as you can see here.

If your page takes longer than 5 seconds to load, most users are like, "ight, I’m out.".

When Users are bouncing off of your website, that means you just fumbled potential traffic. If you have an ecommerce website and you are selling products online, then you fumbled potential customers, clients or a potential lead.

So that’s a serious problem we are facing!

But wait there’s more!

If your page speed is bad, then Google will punish you for it! How can Google punish you for a slow website, you may ask? Well, it will rank you lower in its search results. And we all know that nobody is clicking those low-ranking websites on a Google search results page.

According to Ahrefs, one of 7 critical ranking factors is page speed, right next to backlinks or the freshness of the content, for example.

https://ahrefs.com/blog/google-ranking-factors/#page-speed

Don’t get me wrong, a modern website design is also important. Matter of fact, visitors will bounce off your website if they feel like the design is too old, or it’s too hard for them to navigate. But in my opinion, there are other factors that should be prioritized even higher than, for example, setting different line heights on a mobile view versus a desktop. I mean, nobody really gives a f***.

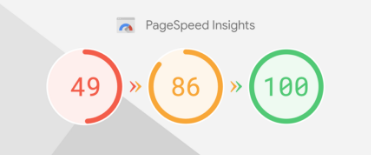
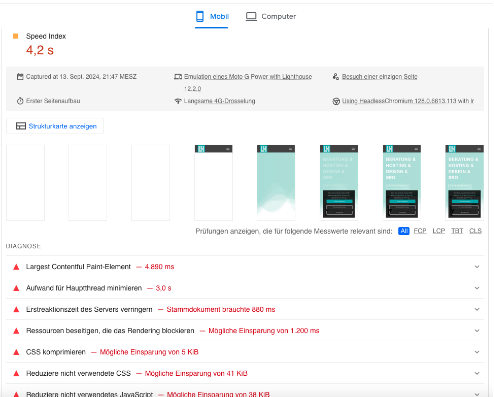
In order to test your website's page speed, you can go to Google PageSpeed, enter your website URL, and it will indicate if your page speed is really bad, if it’s mediocre, or if it’s very good when it’s green.

Underneath that information, google will go into details what content is most critical.

They are really showing you what’s stopping your website from being its best version of itself.

Now let me briefly touch on the 3 most common reasons why your website's page speed sucks so much.

Image Size

A lot of times, you can make your website faster just by changing your assets. A lot of times, people just have these huge, chunky, ridiculously large images on their websites. Like, I saw images with more than 1MB. Can you believe that?

So I hate to break it to you guys, but size matters! Now here’s the good news for you: The smaller, the better!

When it comes to images on a website, you really want to have them as small as possible. 500KB to a maximum of 1MB might be acceptable for a hero image if it’s really necessary, but generally, you should aim for 50KB to 200KB. Also, you should make sure to convert your images to a modern format like WebP.

You can also go a step further and compress your images with TinyPNG.

Non optimized Javascript and CSS

A lot of times a page is loading unnecessarily large CSS and JS files when the page is loading, especially when you built your website with a page builder like Elementor or Avada. Now, there’s nothing wrong with that per se. You can tackle that problem by compressing those files. When doing this, you can imagine the CSS and JS files being a tin can and the plugin being the hydraulic press that just crushes that can. The can now requires less space, resulting in it being much easier and quicker to store or transport. Similarly, by compressing CSS and JS files, they take up less space and load much faster on a webpage. This reduces the amount of data that needs to be transferred when someone visits your site, making the page load quicker, just like a smaller can is easier to carry.

There are tons of plugins out there that will compress your JS and CSS files. One of the most popular ones is Autoptimize. You can just install it, click "compress," and it will take care of the rest.

No Caching

The third reason why your website might be too slow is that there is no caching. Imagine you’re working on a project, and every time you need a tool or document, you have to leave your desk, go to another room, and grab it. That’s pretty time-consuming, right? Now imagine that instead of doing that, you keep all the things you frequently use right on your desk, within easy reach. This way, you save time and can get your work done faster.

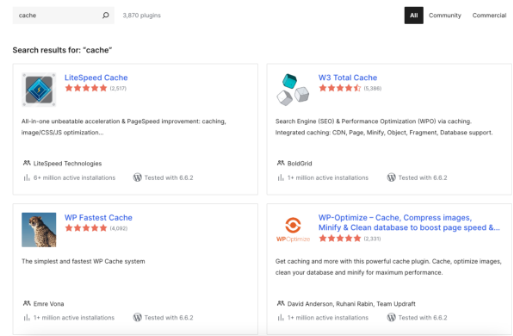
For websites, caching works in a similar way. Without getting too technical, caching can also work wonders a lot of times. For any CMS that you built your website with, there is a caching plugin. If you built your website with WordPress, there are tons of plugins to choose from. Just go to Google and type in "WordPress caching plugin."

Paid solution

Now, if you don’t want to take care of any of those plugins, you’re using WordPress, and you just want a set-and-forget solution, then you can also install a plugin called WP Rocket, which is a paid plugin, but it will take care of everything I talked about for the last 10 minutes, and you don’t have to think about it ever again.

Conclusion:

If you have a given budget (and by budget, I don’t only mean monetary but also time budget) to make a website “good,” then concentrate on the critical factors of a website. Page Speed Optimization IS one of them.

Creating a new shopify app

Introduction

For the last 4 months, I’ve been building a Shopify app. The app, called autobuzz, helps merchants schedule their product images to social media. The goal of the app is to make the lives of solo entrepreneurs easier.

Designed specifically for Shopify merchants, autobuzz streamlines the process of scheduling Instagram posts directly from your Shopify store. The primary benefit of using autobuzz lies in its automation capabilities. Merchants can create a post schedule, ensuring their Instagram feed remains active and engaging without the daily hassle. This not only saves time but also allows for consistent and strategic Instagram marketing for Shopify merchants.

Especially if you are building an e-commerce business by yourself or as a small team, you have to take care of and think about many things. Why not automate the tasks you can easily automate and focus on the core of your business?

Launch Announcement

I am thrilled to announce that autobuzz will officially launch its beta version in July! After months of hard work and dedication, the app is ready to help Shopify merchants elevate their Instagram marketing game. Initially, autobuzz will not be available in the Shopify app store. Instead, you can install it directly from the official website (link to be posted soon). Mark your calendars and be among the first to experience the power of autobuzz. Stay tuned for more updates as we approach the launch date, and get ready to revolutionize your social media management!

To stay updated and be the first to know about exclusive features, special offers, and tips on maximizing autobuzz, sign up for the newsletter. Subscribers will also receive early access to the app, ensuring you can start optimizing your Instagram posts as soon as the beta version is live. Don’t miss out on this opportunity to transform your social media strategy and streamline your e-commerce operations!

Features

Scheduling Posts

With autobuzz, scheduling Instagram posts has never been easier. The app allows Shopify merchants to plan and schedule their posts directly from their Shopify store. This means you can prepare your social media content in advance, ensuring a consistent and engaging presence on Instagram without the need for daily manual uploads. By automating the posting process, autobuzz helps you maintain a steady stream of content, which is crucial for building and retaining an active audience. Simply select the products you want to feature, set your preferred posting times, and let autobuzz handle the rest.

Custom Text Blocks

One of the standout features of autobuzz is the ability to create custom text blocks. Typically, merchants spend considerable time researching the best hashtags to use for their products. With autobuzz, you can save this set of researched hashtags as a text placeholder and reuse it for multiple posts. This feature allows you to craft reusable sets of text, such as captions, hashtags, or promotional messages, which can be easily inserted into your posts. For instance, you can create a text block with your favorite hashtags or a standard caption format, and use it across multiple posts with just a few clicks. This not only saves time but also ensures consistency in your messaging. Custom text blocks make it simple to keep your branding uniform and your audience engaged, without the repetitive task of typing out the same content for each post.

Conclusion

In summary, autobuzz offers a powerful solution for Shopify merchants looking to streamline their Instagram marketing efforts. By automating the scheduling of posts and allowing for the creation of custom text blocks, autobuzz saves you valuable time and ensures a consistent, engaging presence on social media. Whether you're a solo entrepreneur or part of a small team, autobuzz can help you focus on the core aspects of your business while maintaining an active and strategic Instagram profile.

Don’t let the daily grind of social media management hold you back. Embrace the future of Instagram marketing with autobuzz and watch your efficiency soar. Be one of the first to experience this game-changing tool by signing up for the beta version. Visit our website, subscribe to the newsletter for exclusive updates and early access, and get ready to revolutionize your Instagram marketing strategy. Your journey to effortless social media success starts now!

How to debug your shopify application

Debugging your application is an existential step while building your app. You could also console.log every two lines but debugging an application will make your development process a lot easier.

In this quick guide I want to show you how you can debug your shopify application by editing to files:

First you need to create a launch.json file which should be placed inside of your .vscode directory which is at the root of your project directory. If you don't have a .vscode directory then create one.

go to your launch.json file and type in

{
    "version": "0.2.0", 
    "configurations": [
      {
        "command": "npm run dev:x",
        "name": "Run npm run dev",
        "request": "launch",
        "type": "node-terminal",
        "cwd": "${workspaceFolder}"
      },
      {
        "name": "Attach by Process ID",
        "processId": "${command:PickProcess}",
        "request": "attach",
        "skipFiles": ["<node_internals>/**"],
        "type": "pwa-node"
      }
    ]
  }

You should now be able to start your debugger in vs code by clicking the bug icon on the left and then run the debugger by clicking the green arrow next to "RUN AND DEBUG" at the top.

If that doesn't work in your shopify application that was built with Remix js then you might have to go to your remix.config.js and set the sourceMap to true. So just add this line of code

sourceMap: true,

And that's it. Now you should be able to debug your application!

Create custom laravel logs

Trust is good - but logs are better

There are many ways to identify what is going on under the hood of your laravel application. If you want to watch your code step by step then I would highly recommend a debugger for PHP like Xdebug along with the XDebug plugin for VS Code.

You could also use laravel's dd() - or of course also use the good ol' PHP way with var_dump() & print_r() - function which will stop your application and print out any given variable that you passed to the dd() function.

The third option would be logging. Logs can really come in handy for example when your app is retrieving data from external APIs. Sometimes you have to keep track of all of the data that is coming in. Sometimes your app might not work the way you expected it to work and a quick look at the logs might give you a hint to the root of the problem.

In laravel you can create a log entry very easily. Just use any of the methods below anywhere in your code.

use Illuminate\Support\Facades\Log;
 
Log::emergency($message);
Log::alert($message);
Log::critical($message);
Log::error($message);
Log::warning($message);
Log::notice($message);
Log::info($message);
Log::debug($message);

And just like that you can create a log entry withing your storage/logs/laravel.log file. The laravel.log file is set as the default channel for your logs. Your log file can become convoluted very quickly if you write all of your logs only to one file. That's why you want to create multiple custom log files within your application and seperate them thematically. For example you might want to have an error.log and another log for all your requests to the shopify api and so on and so on.

Understanding laravel logging file

If you take a look at the default settings of the config/logging.php file, you can see the default channel. If you haven't set any other values within your .env file then laravel's default channel is the "stack"-channel. Scrolling down the logging.php file you can see an array of channels that are defined within your app. The first item of this array is - your default channel - the stack-channel and it looks something like this:

'stack' => [
    'driver' => 'stack',
    'channels' => ['single'],
    'ignore_exceptions' => false,
],

So the channel name is obviously stack. The driver name is stack too, but what does that mean?

Well laravel has many drivers to choose from, but in this article we're just concentrating on stack and single. When you choose the stack driver, then you can write your log messages to multiple files, or better said multiple channels. You can define which channels to write your logs to in the 'channels' property, which expects an array of channels as a value. By default the only channel that is used here is the 'single' channel.

So let's take a look at the 'single' channel:

'single' => [
    'driver' => 'single',
    'path' => storage_path('logs/laravel.log'),
    'level' => env('LOG_LEVEL', 'debug'),
],

Here we can see that this channel uses the 'single' driver. This tells us that the log message will only be written to one file. Which file? You might ask. Well, that is defined within the 'path' property of the 'single' channel array. And in there we can see, that the logs are written to the laravel.log file - as expected. The level tells us which Log message are actually being written to the log files based on the log level. laravel provides all log levels that are defined in the RFC 5424 specification. That means if you specify a log level of warning within your channel, then the following message wouldn't be printed:

Log::info($message);

because it is a level below warning!

Creating own log channel

So with all this knowledge we can now finally create our own Log channel! In order to do this, we will have to navigate back to our config/logging.php file and add an item to our 'channels' array. In my case it looks something like this:

'channels' => [

    ...,

    'shopify' => [
        'driver' => 'single',
        'path' => storage_path('logs/shopify_API.log'),
    ],

],

As you can see I created a new channel that writes a log file to storage/logs/shopify_API.log. In order to call this channel from anywhere in my application all I have to do is to call the following method:

Log::channel('shopify')->info('API info message', ['user_id' => 1]);

Customizing log message

Now let's step things up a notch and customize our logging message:

In order to do that we will have to create a new class within our app. So let's add a 'Logging' directory within our app directory wehre we add a new php file called CustomizedFormatter.php. The file should look something like this:

<?php

namespace App\Logging;

use Monolog\Formatter\LineFormatter;

class CustomizeFormatter
{
    public function __invoke($logger)
    {
        foreach ($logger->getHandlers() as $handler) {
            $handler->setFormatter(new LineFormatter(
                '{%datetime%} %message% // %context%'
            ));
        }
    }
}

As you can see, we define our desired format within the new LineFormatter class. Of course you can choose whatever format you like, I just made up an example.

In our last step we just have to tell our channel to use that custom formatter. That is easily done by going back to your logging.php file. Now we have to add the 'tap' property to our channel, in there we have to define an array. Within that array we pass our newly created CustomizeFormatter class. The channel should look like this:

use App\Logging\CustomizeFormatter;

...

'shopify' => [
    'tap' => [CustomizeFormatter::class],
    'driver' => 'single',
    'path' => storage_path('logs/shopify_API.log'),
],

And just like that you have created a custom log for your laravel application!

shopify invalid session token

Invalid session token - solve the annoying shopify error

If you have been working with shopify apps then you might have come across an error that says that you have an invalid session token. The reason behind this error might come from a race condition. The client tries to get some information from the server before it received a valid session token. Usually the client should have a session token, when making requests but you cannot be a 100% sure all of the time, thus the error is presented.

If you are making requests with axios then your request might look something like this:

// WRONG AND WIll LEAD TO ERROR DUE TO RACE CONDITIONS!!
axios
.get("https://test-application.test/api/endpoint")
.then(
    (response: {
        data: {
            content: string;
        };
    }) => {
            console.log("data:", data);
        );
    }
)
.catch((error) => {
    console.log("ERROR:", error);
});

In order to make sure that there won't be a race condition you can intercept your client's call and add some properties to the headers. All of this can be done very easily with axios. We want to make sure that the session token is always sent to the server, and in order to create a session token you will have to install an npm package from shopify.

You will need some methods from the shopify app-bridge-utils so make sure to install the npm package @shopify/app-bridge-utils:

npm i @shopify/app-bridge-utils
const instance = axios.create();
// Intercept all requests on this axios instance

instance.interceptors.request.use(function (config) {
return getSessionToken(app).then((token) => {
    config.headers["Authorization"] = `Bearer ${token}`;
        return config;
    });
});

instance
.get('https://test-application.test/api/endpoint')
.then(
    (response: {
        data: {
            themeName: string;
            appBlocksEnabled: string;
        };
    }) => {
        console.log("data:", data);
        setThemeName({ name: response.data.themeName });
        setContentLoaded(true);
        setSupportsAppBlocks(
            response.data.appBlocksEnabled === "partly" ||
                "completely"
                ? true
                : false
        );
    }
)
.catch((error) => {
    console.log("ERROR:", error);
});

And now your invalid session token error shouldn't appear anymore.

You can also watch my video right here:

Shopify Script tags conditional dispatching

Shopify 2.0 themes now offer the use of app blocks. If a theme is using app blocks, then your app shouldn't dispatch any script tags. Now if you're an laravel app developer you're probably using this laravel package from osiset.

Unfortunately this package does not yet provide the possibility to ask if app blocks are available or not. If you're using the package then script tags will always be dispatched. If you want need to load the script tags conditional, then you will have to do a little editing.

All of the code that I will show you here will work with the package at version 17.1. So you should make sure to upgrade your laravel package.

all credits of this code go to https://github.com/apurbajnu as he coded it you can also read along this GitHub Issue: https://github.com/osiset/laravel-shopify/issues/980#issuecomment-991649153. I just made some slide changes to make the code work with version 17.1

Also make sure to give your app the correct access scopes. In order to check for app blocks, you need to give your app the 'read_themes' scope!

  1. Go to the env file and add this line depending on whatever template you need.

2. Go to config/shopify-app.php and add this line.

3. Go to vendor/osiset/laravel-shopify/src/Contracts/ApiHelper.php and add these lines.

4. Go to vendor/osiset/laravel-shopify/src/Services/ApiHelper.php and add these lines. (carbon.now.sh won't let me copy such long lines of code, that's why this code looks a little ugly)

    public function getThemes(array $params = []): ResponseAccess
    {
        // Setup the params
        $reqParams = array_merge(
            [
                'limit' => 250,
                'fields' => 'id,role',
            ],
            $params
        );

        // Fire the request
        $response = $this->doRequest(
            ApiMethod::GET(),
            '/admin/themes.json',
            $reqParams
        );

        return $response['body']['themes'];
    }

    /**
     * {@inheritdoc}
     */


    public function scriptTagShouldBeEnabled(array $app_block_templates = [], array $params = []): bool
    {

        if (count($app_block_templates) > 0) {

            $themes = $this->getThemes();
            $published_theme = null;
            $templateJSONFiles = [];
            $sectionsWithAppBlock = [];
            $main = false;
            $templateMainSections = [];
            if (count($themes) !== 0) {
                foreach ($themes as $theme) {
                    if ($theme['role'] === 'main') {
                        $published_theme = $theme['id'];
                    }
                }
            }

            if (!is_null($published_theme)) {
                // Setup the params
                $reqParams = array_merge(
                    [
                        'fields' => 'key',
                    ],
                    $params
                );

                // Fire the request
                $response = $this->doRequest(
                    ApiMethod::GET(),
                    "/admin/themes/{$published_theme}/assets.json",
                    $reqParams
                );


                $assets = $response['body']['assets'];

                if (count($assets) > 0) {
                    foreach ($assets as $asset) {

                        foreach ($app_block_templates as $template) {

                            $trimmedTemplate = trim($template);

                            if ($asset['key'] === "templates/{$trimmedTemplate}.json") {

                                $templateJSONFiles[] = $asset['key'];
                            }
                        }
                    }

                    if (count($templateJSONFiles) == count($app_block_templates)) {
                        foreach ($templateJSONFiles as $file) {
                            $acceptsAppBlock = false;
                            $reqParams = array_merge(
                                [
                                    'fields' => 'value',
                                ],
                                ['asset[key]' => $file]
                            );

                            // Fire the request
                            $response = $this->doRequest(
                                ApiMethod::GET(),
                                "/admin/themes/{$published_theme}/assets.json",
                                $reqParams
                            );

                            $asset = $response['body']['asset'];

                            $json = json_decode($asset['value'], true);
                            $query = 'main-';

                            if (array_key_exists('sections', (array)$json) && count($json['sections']) > 0) {
                                foreach ($json['sections'] as $key => $value) {
                                    if ($key === 'main' || substr($value['type'], 0, strlen($query)) === $query) {
                                        $main = $value;
                                        break;
                                    }
                                }
                            }

                            if ($main) {
                                $mainType = $main['type'];
                                if (count($assets) > 0) {
                                    foreach ($assets as $asset) {
                                        if ($asset['key'] === "sections/{$mainType}.liquid") {
                                            $templateMainSections[] = $asset['key'];
                                        }
                                    }
                                }
                            }
                        }

                        if (count($templateMainSections) > 0) {
                            $templateMainSections = array_unique($templateMainSections);
                            foreach ($templateMainSections as $templateSection) {
                                $acceptsAppBlock = false;
                                $reqParams = array_merge(
                                    [
                                        'fields' => 'value',
                                    ],
                                    ['asset[key]' => $templateSection]
                                );

                                // Fire the request
                                $response = $this->doRequest(
                                    ApiMethod::GET(),
                                    "/admin/themes/{$published_theme}/assets.json",
                                    $reqParams
                                );
                                $asset = $response['body']['asset'];

                                $match = preg_match('/\{\%\s+schema\s+\%\}([\s\S]*?)\{\%\s+endschema\s+\%\}/m', $asset['value'], $matches);

                                $schema = json_decode($matches[1], true);

                                if ($schema && array_key_exists('blocks', $schema)) {
                                    foreach ($schema['blocks'] as $block) {
                                        if (array_key_exists('type', (array)$block) && $block['type'] === '@app') {
                                            $acceptsAppBlock = true;
                                        }
                                    }
                                    //   $acceptsAppBlock = .some((b => b.type === '@app'));
                                }
                                $acceptsAppBlock ? array_push($sectionsWithAppBlock, $templateSection) : null;
                            }
                        }
                    }


                    if (count($sectionsWithAppBlock) > 0  && count($sectionsWithAppBlock) === count($templateJSONFiles)) {
                        return false;
                    }

                    if (count($sectionsWithAppBlock) > 0) {
                        return false;
                    }
                }
            }
        }

        return true;
    }

6. Go To vendor/osiset/laravel-shopify/src/Actions/DispatchScripts.php and add these lines

so the __invoke Method at DispatchScripts.php should look something like this:

Now you need just need to make sure to override those classes in your project. Otherwise all your code will be overriden the next you update the package!

I hope this could help you a little bit when you build your shopify app!