Invalid session token - solve the annoying shopify error
If you have been working with shopify apps then you might have come across an error that says that you have an invalid session token. The reason behind this error might come from a race condition. The client tries to get some information from the server before it received a valid session token. Usually the client should have a session token, when making requests but you cannot be a 100% sure all of the time, thus the error is presented.
If you are making requests with axios then your request might look something like this:
// WRONG AND WIll LEAD TO ERROR DUE TO RACE CONDITIONS!!
axios
.get("https://test-application.test/api/endpoint")
.then(
    (response: {
        data: {
            content: string;
        };
    }) => {
            console.log("data:", data);
        );
    }
)
.catch((error) => {
    console.log("ERROR:", error);
});
In order to make sure that there won't be a race condition you can intercept your client's call and add some properties to the headers. All of this can be done very easily with axios. We want to make sure that the session token is always sent to the server, and in order to create a session token you will have to install an npm package from shopify.
You will need some methods from the shopify app-bridge-utils so make sure to install the npm package @shopify/app-bridge-utils:
Shopify 2.0 themes now offer the use of app blocks. If a theme is using app blocks, then your app shouldn't dispatch any script tags. Now if you're an laravel app developer you're probably using this laravel package from osiset.
Unfortunately this package does not yet provide the possibility to ask if app blocks are available or not. If you're using the package then script tags will always be dispatched. If you want need to load the script tags conditional, then you will have to do a little editing.
All of the code that I will show you here will work with the package at version 17.1. So you should make sure to upgrade your laravel package.
all credits of this code go to https://github.com/apurbajnu as he coded it you can also read along this GitHub Issue: https://github.com/osiset/laravel-shopify/issues/980#issuecomment-991649153. I just made some slide changes to make the code work with version 17.1
Also make sure to give your app the correct access scopes. In order to check for app blocks, you need to give your app the 'read_themes' scope!
Go to the env file and add this line depending on whatever template you need.
2. Go to config/shopify-app.php and add this line.
3. Go to vendor/osiset/laravel-shopify/src/Contracts/ApiHelper.php and add these lines.
4. Go to vendor/osiset/laravel-shopify/src/Services/ApiHelper.php and add these lines. (carbon.now.sh won't let me copy such long lines of code, that's why this code looks a little ugly)
    public function getThemes(array $params = []): ResponseAccess
    {
        // Setup the params
        $reqParams = array_merge(
            [
                'limit' => 250,
                'fields' => 'id,role',
            ],
            $params
        );

        // Fire the request
        $response = $this->doRequest(
            ApiMethod::GET(),
            '/admin/themes.json',
            $reqParams
        );

        return $response['body']['themes'];
    }

    /**
     * {@inheritdoc}
     */


    public function scriptTagShouldBeEnabled(array $app_block_templates = [], array $params = []): bool
    {

        if (count($app_block_templates) > 0) {

            $themes = $this->getThemes();
            $published_theme = null;
            $templateJSONFiles = [];
            $sectionsWithAppBlock = [];
            $main = false;
            $templateMainSections = [];
            if (count($themes) !== 0) {
                foreach ($themes as $theme) {
                    if ($theme['role'] === 'main') {
                        $published_theme = $theme['id'];
                    }
                }
            }

            if (!is_null($published_theme)) {
                // Setup the params
                $reqParams = array_merge(
                    [
                        'fields' => 'key',
                    ],
                    $params
                );

                // Fire the request
                $response = $this->doRequest(
                    ApiMethod::GET(),
                    "/admin/themes/{$published_theme}/assets.json",
                    $reqParams
                );


                $assets = $response['body']['assets'];

                if (count($assets) > 0) {
                    foreach ($assets as $asset) {

                        foreach ($app_block_templates as $template) {

                            $trimmedTemplate = trim($template);

                            if ($asset['key'] === "templates/{$trimmedTemplate}.json") {

                                $templateJSONFiles[] = $asset['key'];
                            }
                        }
                    }

                    if (count($templateJSONFiles) == count($app_block_templates)) {
                        foreach ($templateJSONFiles as $file) {
                            $acceptsAppBlock = false;
                            $reqParams = array_merge(
                                [
                                    'fields' => 'value',
                                ],
                                ['asset[key]' => $file]
                            );

                            // Fire the request
                            $response = $this->doRequest(
                                ApiMethod::GET(),
                                "/admin/themes/{$published_theme}/assets.json",
                                $reqParams
                            );

                            $asset = $response['body']['asset'];

                            $json = json_decode($asset['value'], true);
                            $query = 'main-';

                            if (array_key_exists('sections', (array)$json) && count($json['sections']) > 0) {
                                foreach ($json['sections'] as $key => $value) {
                                    if ($key === 'main' || substr($value['type'], 0, strlen($query)) === $query) {
                                        $main = $value;
                                        break;
                                    }
                                }
                            }

                            if ($main) {
                                $mainType = $main['type'];
                                if (count($assets) > 0) {
                                    foreach ($assets as $asset) {
                                        if ($asset['key'] === "sections/{$mainType}.liquid") {
                                            $templateMainSections[] = $asset['key'];
                                        }
                                    }
                                }
                            }
                        }

                        if (count($templateMainSections) > 0) {
                            $templateMainSections = array_unique($templateMainSections);
                            foreach ($templateMainSections as $templateSection) {
                                $acceptsAppBlock = false;
                                $reqParams = array_merge(
                                    [
                                        'fields' => 'value',
                                    ],
                                    ['asset[key]' => $templateSection]
                                );

                                // Fire the request
                                $response = $this->doRequest(
                                    ApiMethod::GET(),
                                    "/admin/themes/{$published_theme}/assets.json",
                                    $reqParams
                                );
                                $asset = $response['body']['asset'];

                                $match = preg_match('/\{\%\s+schema\s+\%\}([\s\S]*?)\{\%\s+endschema\s+\%\}/m', $asset['value'], $matches);

                                $schema = json_decode($matches[1], true);

                                if ($schema && array_key_exists('blocks', $schema)) {
                                    foreach ($schema['blocks'] as $block) {
                                        if (array_key_exists('type', (array)$block) && $block['type'] === '@app') {
                                            $acceptsAppBlock = true;
                                        }
                                    }
                                    //   $acceptsAppBlock = .some((b => b.type === '@app'));
                                }
                                $acceptsAppBlock ? array_push($sectionsWithAppBlock, $templateSection) : null;
                            }
                        }
                    }


                    if (count($sectionsWithAppBlock) > 0  && count($sectionsWithAppBlock) === count($templateJSONFiles)) {
                        return false;
                    }

                    if (count($sectionsWithAppBlock) > 0) {
                        return false;
                    }
                }
            }
        }

        return true;
    }
6. Go To vendor/osiset/laravel-shopify/src/Actions/DispatchScripts.php and add these lines
so the __invoke Method at DispatchScripts.php should look something like this:
Now you need just need to make sure to override those classes in your project. Otherwise all your code will be overriden the next you update the package!
I hope this could help you a little bit when you build your shopify app!
In this article I want to share some resources that helped me develop a better understanding for developing apps or respectively building a micro Saas.
5. Shopify Github Projects
When I started out with my first app I just started coding right away without really thinking about best practices. I didn't know how Polaris is supposed to be used and their different components should work together. Of course there is a documentation, but that documentation didn't show me a whole page. They only show the code for a single component.
It was like an eye opener for me when I looked at their source code.
You can take a look at an example reviews app that they have created:
They provide really clean and readable code. So you should definitely check that out!
4. OnlineBiz YouTube Channel
When you build an app you're not just building an app, you are actually building a business. You're building a Micro Saas. The first time I heard the term micro Saas was on this channel. And it changed the way I looked at building Shopify apps. I started to realize how hard it is to actually come up with an idea. And even if you have many app ideas then you should validate them and make sure that they are worth to invest some time in them.
I didn't know anything about validating app ideas until I watched their videos. There is a ton of knowledge for you to pick up if you are at a beginner level of building your business. And these guys know what they're talking about. They are the owners of ReConvert, a very popular Shopify app with over a million Dollars of yearly revenue.
My last point leads me directly to the Polaris Framework which is a great resource for Shopify app developers. But Polaris is kind of like a double sided sword. It will make your app look very shopify-ish (which is the goal of Polaris). So if you are building an app that is supposed to work with different Shopping Systems like WooCommerce, Magento, BigCommerce, etc. well then it can cause some confusion for the users.
Nonetheless you should still consider using it, since this will make your development speed so much faster. If you use their components then you don't have to think about color schemes, shadows, media query and all that stuff anymore. Everything is already done if you use it correctly.
Of course you could still use a library like bootstrap, but that will make your app look very generic if you don't customize it all.
"The sooner you start coding, the longer your project", that is a quote I heard somewhere and I must say it is very true! If you don't plan or structure your project in any way then it will take forever. It is always advisable to start out with a basic layout of your app. If you're developing by yourself you can quickly see what layouts and components work well together. You will be able to quickly see if a layout is looking good or not. If you're working together with team mates, then you can quickly send them mock ups of your ideas and see how they like it. All without writing a single line of code.
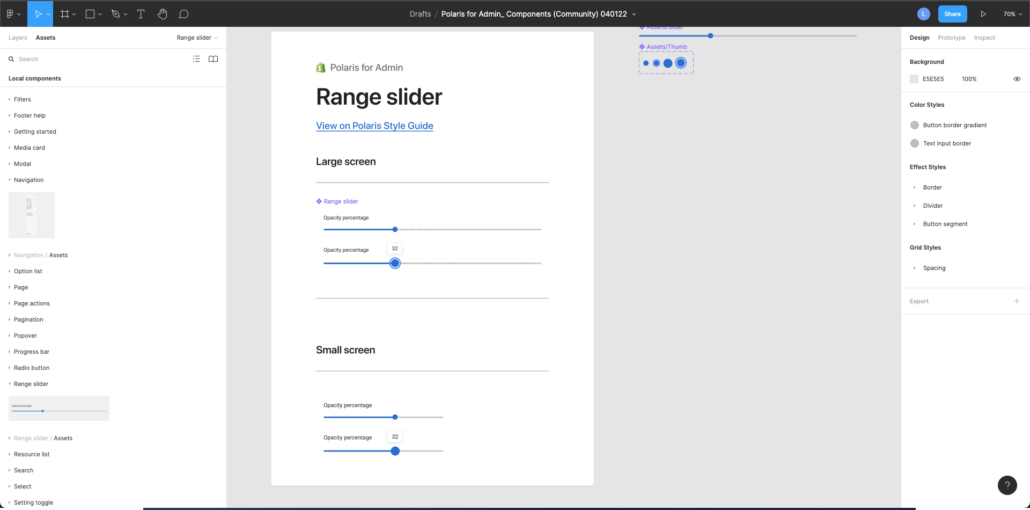
There are design tools like Adobe XD, Sketch or Figma. Luckily Shopify provides us with all of their components for Figma. The best part is that it is all for free! All you have to do is create an account at Figma and duplicate the "Polaris for Admin" project which you can find here:
Now you will have all of the Polaris components at your disposal:
This will enable you to set up a layout very quickly. The best part is that you can adjust the components in the same ways as you can implement the later on. So you will have a very good overview of the capabilities of the components when building the layout.
I compared it to a dashboard UI Kit that I have bought on themeforest (This UI Kit came with Figma and React components as well). I wanted to compare it because honestly the Polaris Admin UI Kit looks very boring and not very modern. But unfortunately I was very disappointed by the UI Kit from themeforest. It looked great at first, but I had a hard time adjusting any components. It took me quite a while to adjust a component after a I changed a simple text. The components seemed to break as soon as I changed something in there.
Now I must say that I'm not an expert at Figma, I'm a developer. And that is exactly the power of Shopify's UI Kit. You can just open the file and start building good looking layouts without being a professional designer. That is the real power of it!
1. Preetam Nath Blog on micro Saas
One of the most valuable resources for me was the blog from an app developer named Preetam Nath. He is a very inspiring person and has a great blog! But what stood out the most for me was his post about Shopify micro Saas. He really goes into detail about finding an app idea. He shows you how to scan the market and how to find a profitable niche. This is really the first and most important thing that you should think about when you want to build your app.
As developers it is not very difficult for us to build Software, but the hard part is to build software that people really need and want! In his blog post Preetam goes deep into this topic and I highly recommend his content to you. He even provides you with a very valuable spreadsheet where you can take a look how he structures his notes.
Seeing this spreadsheet was a massive eye opener for me when I first saw it. I also realized that building an app requires a lot more preparation than I have imagined.
Hopefully you found some good and helpful resources for yourself and your business. I like to share everything that was helpful for me, because I believe that if it helped me, then there will be at least one person out there that will find it just as helpful and maybe that person is you who is reading this text right now ;)
Shameless plug:
I also have a YouTube channel where I talk a about Shopify app development. That might also be a great resource for you!
https://l4webdesign.de/wp-content/uploads/2022/01/frame-harirak-Ei_lQ6kTwiI-unsplash.jpg14401920LeeKlopfershttps://l4webdesign.de/wp-content/uploads/2020/07/L4_Bildmarke_4C_Türkis.pngLeeKlopfers2022-01-12 17:17:492022-01-12 17:17:505 great resources for Shopify app developers
Shopify made in incredibly easy for you to create a shopify app in 2022. All you have to do is update your shopify cli and run the latest version. You can checkout you shopify CLI version by typing in shopify version in your terminal. If you run version 2.7.3 or higher then you can be sure that the shopify app CLI is available to you.
Now cd into the directory where you want to install your app. Now just type in
this will create a new laravel project. Shopify also provides the ability to create a node.js project or a ruby project right from the CLI!
You might think that you can instantly open your app by typing in shopify app open. But unfortunately that won't work yet. Some configuration is still necessary.
First you have to make sure that your ngrok connection is authenticated. So you will have to create an account and open your dashboard at ngrok. In there you can navigate to your Auth token and copy that value.
Now go back to your terminal and type in
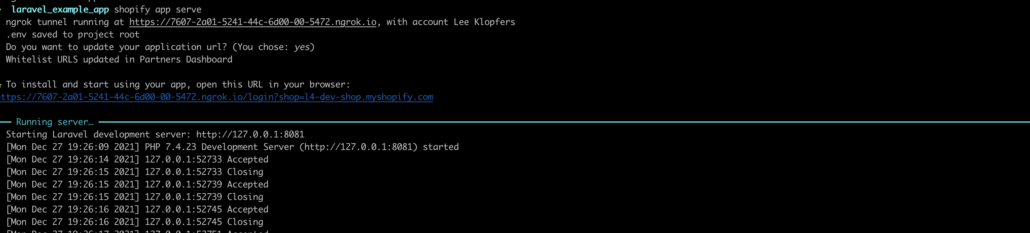
Now your ngrok connection is authenticated. Your shopify application needs ngrok to connect to your shop. Now you can start your app by typing in
This command will automatically start a new tunnel via ngrok and start a local development server.
The CLI will ask you if you want to update your application url. If you have no other reason why you shouldn't update your app url, then click yes.
This step is important, because every time you restart your application you will get a new ngrok-url. This means your local application is now reachable under a new url. That's why you would have to update your app url in your partners dashboard again. But the shopify CLI will do that for you automatically.
Your terminal should now look something like this:
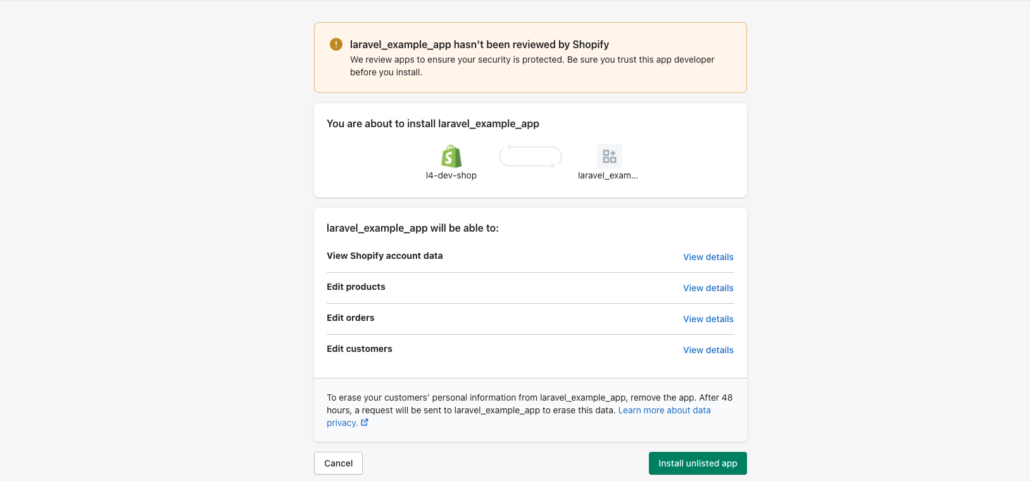
If you press command or ctrl and click on the link in the console then you will be taken to installation window of shopify. That page will look something like this:
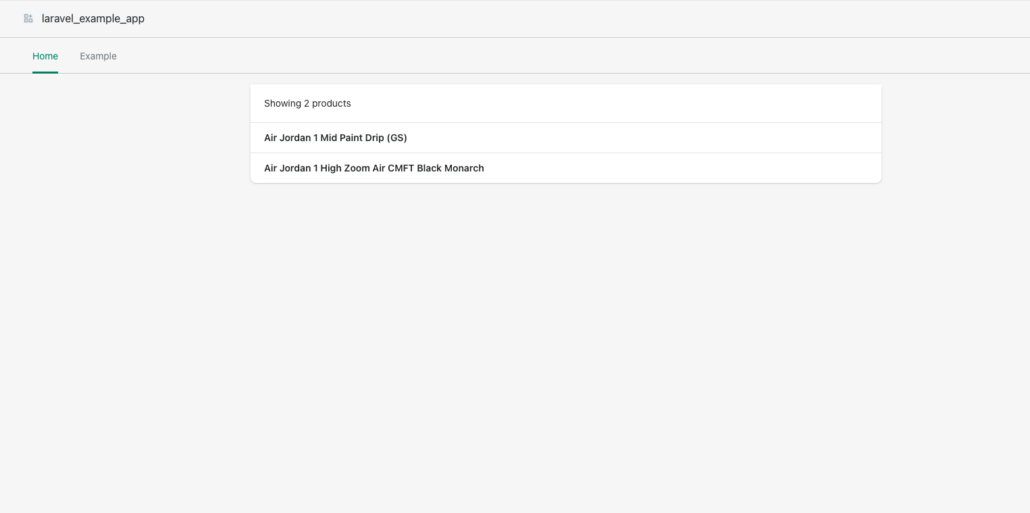
If you click on install unlisted app then you should see something like this:
Congrats! You just created a shopify app in a matter of minutes.
https://l4webdesign.de/wp-content/uploads/2021/12/onur-binay-aJE97FULn_g-unsplash.jpg12801920LeeKlopfershttps://l4webdesign.de/wp-content/uploads/2020/07/L4_Bildmarke_4C_Türkis.pngLeeKlopfers2021-12-27 19:01:172022-01-12 17:19:37How to create a shopify app in 2022
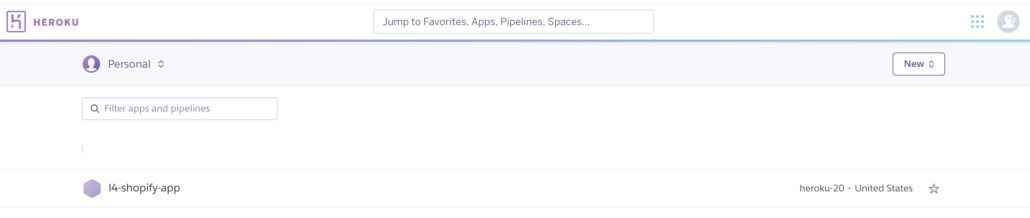
You’ve made it! You successfully created your shopify app. Now it’s time to deploy it! I want to write a step by step guide about laravel app deployment. We will deploy an app to heroku which is completely free.
there are some prerequisits for you to follow along:
If you take a look at the Procfile, you can see that we are referencing a nginx_app.conf file. We also have to create that and set it up
2. Setting up nginx config file
type touch nginx_app.conf to create the config file. Then paste in these settings:
3. Login to Heroku
To log into Heroku, type heroku login. Your browser will open and you will be redirected to a login page where you can enter your credentials. If everything worked then you’re logged in and you can now use the heroku CLI.
4. Create heroku application
Let’s switch back to our terminal so we can use the heroku-cli. As a side note: we are still at the root of our project. type heroku create name-of-app. If you don’t put a name for the app, Heroku will create a random name and URL for it. It should look something like this:
Now if you go to your dashboard on heroku you can see that your app was created succesully.
If you type in git remote -v then you will see, that heroku has already created a git repo for you.
Now any time you will push to that repo, heroku will trigger a new deployment. In this guide we will push to herokus repo directly, but it is also possibe to connect your github account with heroku. That way you can always push to your github repo and it will trigger a deployment as well.
5. Push your code to Heroku
Push your code from the command line just like you would push it to github, but instead of the remote origin, push your changes to the remote heroku branch:
notice the flag --allow-empty This might come in handy at some time, when you want to trigger a deployment, but you haven’t made any changes to your code.
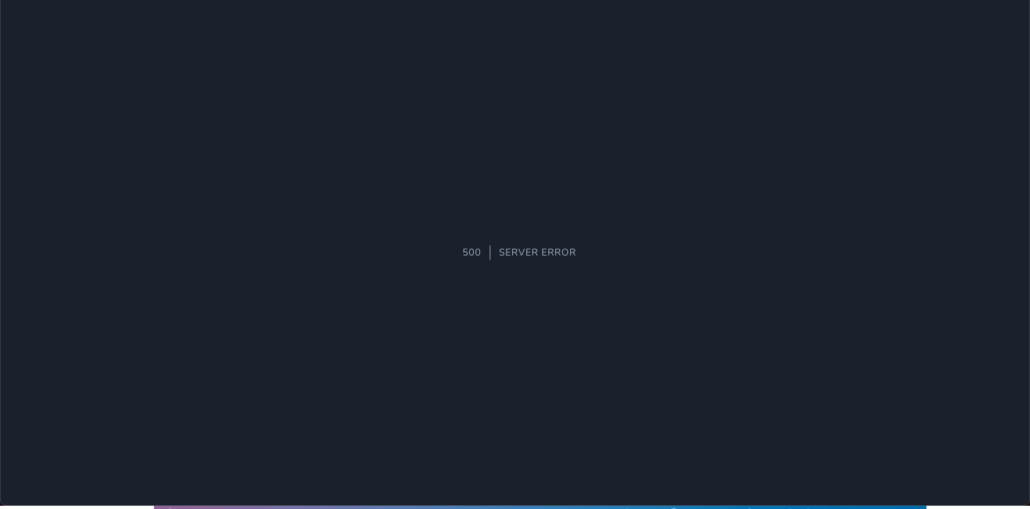
6. Checkout and debug deployed app
Your app should be deployed now, so let’s check it out! go to https://l4-shopify-app.herokuapp.com/ and take a look! You should now see something like this:
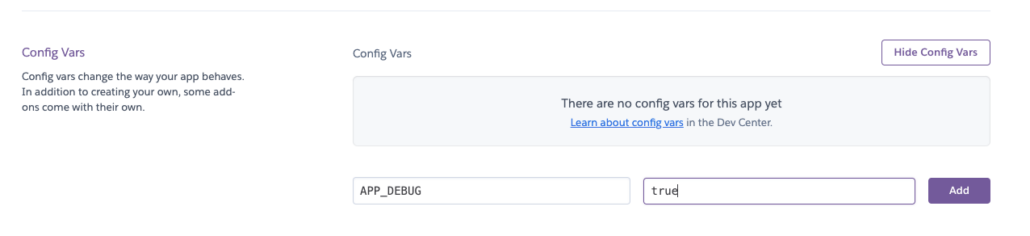
This is good and bad at the same time. It’s good because the deployment worked but it’s bad because the app is not running yet. In order to see what causes our error, we can add APP_DEBUG=true to our .env file.
Important: when you copy all of your .env files, make sure that you update your APP_URL. Also make sure that you enter the correct values for SHOPIFY_API_KEY and SHOPIFY_API_SECRET. Otherwise the hmac will not be calculated correctly and you will see an error.
There are two ways to set up your .env file. Either on your heroku dashboard, or right on your CLI:
Edit .env on heroku Dashboard: From your dashboard, navigate to Settings and click Reveal Config Vars. Now you can set up all your environment variables.
Edit .env on CLI If you prefer the CLI you can use the command heroku config:add ENV_CONFIG=value So in this example I could have typed in
heroku config:add APP_DEBUG=true
This will give you the same results. If you want to add a little vim magic, you could add the command heroku config:add to the beginning of every line (checkout How to insert text at beginning of a multi-line selection in vi/Vim ) and you would have a script to add all of your environment variables.
7. Create Database
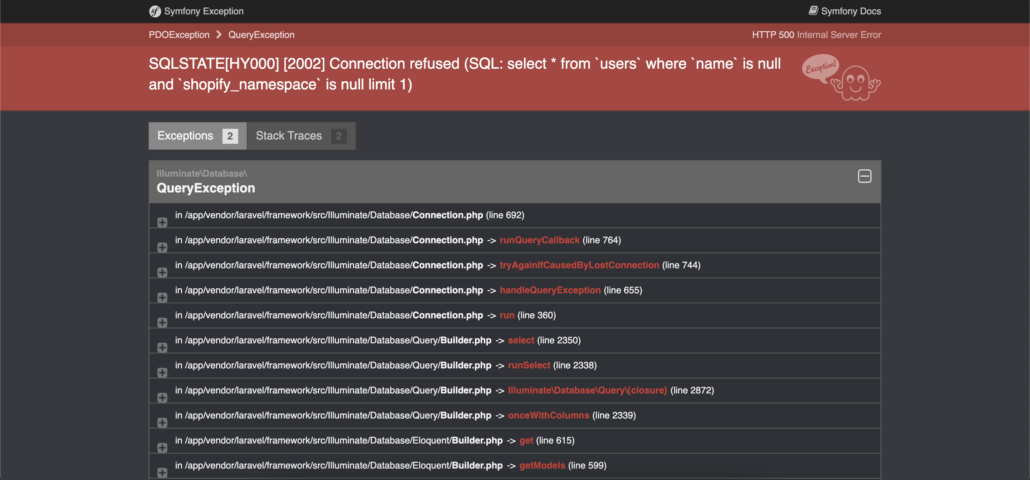
If we refresh our app on heroku we will see the following error page:
It says that the connection was refused. That happened because we haven’t set up a database yet. So let’s do this right now.
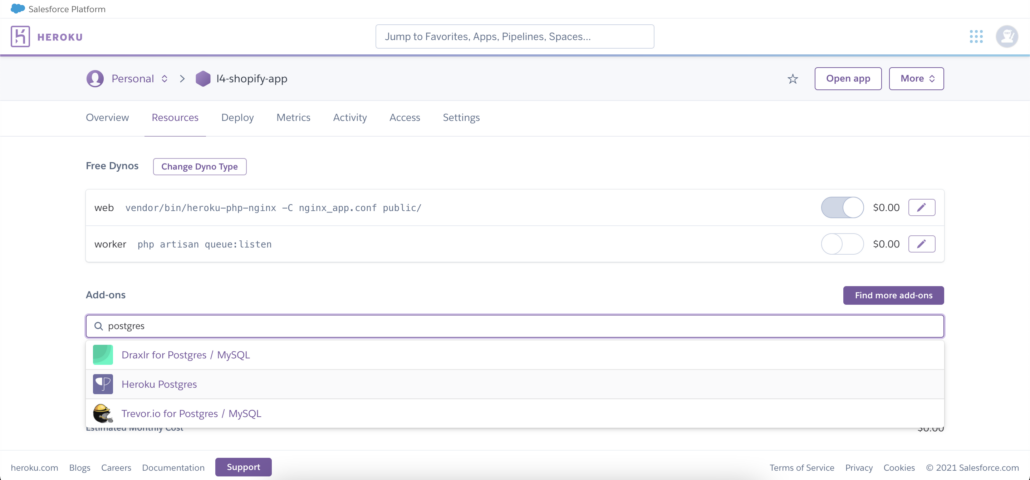
If you go to Resources you can search for resources for your app. Here you can search for your database. You can chose any database you want, like MySQL, MariaDB, MongoDB. I would recommend to use Heroku Postgres since they provide best offer. Here you can use up to 1GB of storage which I haven’t seen on any of the other databases.
Add this add-on and you will see, that postgres is now attached as your database.
8. Database credentials
In order to set up our database we need setup our database credentials. We will get all of the required properties by typing heroku pg:credentials:url in the command line.
We can now copy and paste all of the credentials to our environment variables. Remember how we did it in step 6a) or 6b) ?
Remember to add DB_CONNECTION=pgsql to your environment variables, since this was not on the output of our terminal.
You now have two options to create your migration:
run heroku run php artisan migrate --seed
run heroku run bash -a app-name Now you have access to the bash of your app. from there you can now run php artisan migrate --seed as well.
10. Create a public app at shopify dashboard
Set up a public app in shopify. If you don’t know how that is done, then you can watch my video here or read my article.
Don't forget to setup all of the environment variables in your heroku app.
11. You’re done 🎉
Congrats! You deployed your app to heroku!
You should now see your embedded shopify app if you install your app in a development store
https://l4webdesign.de/wp-content/uploads/2021/12/L4-Webdesign-shopify-app-deployment-heroku.jpeg12801920LeeKlopfershttps://l4webdesign.de/wp-content/uploads/2020/07/L4_Bildmarke_4C_Türkis.pngLeeKlopfers2021-12-03 17:55:002021-12-06 22:43:08How to deploy a Laravel app to Heroku in 10 steps
Sometimes you may want to make REST API Calls to your Shopify Store. For example you may want to check the installed theme of your store and check if it supports app blocks.
The easiest way to do this is by going to your store and make the REST call right in your browser. Let’s take the theme example. If you navigate to
{your-store}.myshopify.com/admin/themes
You will be presented an overview of all your themes on your User interface. However if you add .json to that URL you will get the according JSON response:
{your-store}.myshopify.com/admin/themes.json
This request works because you are authenticated with your store. But how do you request this data if you are not authenticated? For example if you want to send a request with Postman?
The answer is: you will have to create a private app, get the credentials from that app and then you can make authenticated requests. And this is how it’s done:
Go to your stores admin dashboard.
go to Apps
Scroll all the way to the bottom. There you should see the possibility to “Manage private apps“
You can now click create a new private app. Make sure to create an app with all the access scopes that you need.
After creating the new private app you can go back to the overview page of your private app. On there you will see your newly created private app.
In order to get the apps API key and Password, click on the app’s name. You will be redirected to the app’s detail page
You can now prepare the URL for your request. The request URL will have to look as follows
That’s it! Now you can make authenticated API calls to your store via Postman!
If you don't feel like reading, check out my video:
https://youtu.be/9a7A2pTtTDc
https://l4webdesign.de/wp-content/uploads/2021/11/REST-call.jpeg7181280LeeKlopfershttps://l4webdesign.de/wp-content/uploads/2020/07/L4_Bildmarke_4C_Türkis.pngLeeKlopfers2021-11-16 22:22:062021-11-16 22:25:24Making REST API calls to shopify store
Your app is now located at the following URL:
https://<app-name>.test
Go to your project folder. Navigate to shopify-app.php and
find 'api_scopes'. Here you can set all Shopify
API scopes that are needed for your app. A list of all API
Scopes can be found here →
https://shopify.dev/docs/admin-api/access-scopes.
Go to web.php and edit the routes. Replace the existing routes
with the following code. This way you’re addding middleware to
the welcome page and you’re creating a route for the login
page.
Route::get('/', function () {
    return view('welcome');
})->middleware(['verify.shopify'])->name('home');

//This will redirect user to login page.
Route::get('/login', function () {
    if (Auth::user()) {
        return redirect()->route('home');
    }
    return view('login');
})->name('login');
Replace content of welcome.blade.php with this one.
@extends('shopify-app::layouts.default')

@section('content')
    <!-- You are: (shop domain name) -->
    <p>You are: {{ Auth::user()->name }}</p>
@endsection

@section('scripts')
    @parent

    <script type="text/javascript">
        var AppBridge = window['app-bridge'];
        var actions = AppBridge.actions;
        var TitleBar = actions.TitleBar;
        var Button = actions.Button;
        var Redirect = actions.Redirect;
        var titleBarOptions = {
            title: 'Welcome',
        };
        var myTitleBar = TitleBar.create(app, titleBarOptions);
    </script>
@endsection
Edit User Model. Add following code to existing namespaces
use Osiset\ShopifyApp\Contracts\ShopModel as IShopModel;
use Osiset\ShopifyApp\Traits\ShopModel;
Change class from this:
class User extends Authenticatable
to this:
class User extends Authenticatable implements IShopModel
add following line within your class
use ShopModel;
Your class should now look like this:
<?php

namespace App\Models;

use Illuminate\Notifications\Notifiable;
use Illuminate\Foundation\Auth\User as Authenticatable;
use Osiset\ShopifyApp\Contracts\ShopModel as IShopModel;
use Osiset\ShopifyApp\Traits\ShopModel;

class User extends Authenticatable implements IShopModel
{
    use Notifiable;
    use ShopModel;

    /**
     * The attributes that are mass assignable.
     *
     * @var array
     */
    protected $fillable = [
        'name', 'email', 'password',
    ];

    /**
     * The attributes that should be hidden for arrays.
     *
     * @var array
     */
    protected $hidden = [
        'password', 'remember_token',
    ];
}
Setup your databse in your .env file.
Nachdem alles durch ist, mit
php artisan migrate alles migrieren
If you visit your application you should get an error saying:
“Osiset\ShopifyApp\Exceptions\MissingShopDomainException“. That
is because we haven’t setup the from the intershop side yet.
You can now visit your app at
https://<app-name>.test/?shop=yourshopname.myshopify.com
https://l4webdesign.de/wp-content/uploads/2021/11/laravel-shopify-app.jpeg9691920LeeKlopfershttps://l4webdesign.de/wp-content/uploads/2020/07/L4_Bildmarke_4C_Türkis.pngLeeKlopfers2021-11-03 21:51:032021-12-03 18:08:21How to create a Shopify App with laravel
Shopware ist aus dier Liste der beliebten E-Commerce Lösungen der einzige Software-Hersteller aus Deutschland. Er bietet seine Software auch als Open Source an (Community Edition). Gerade für User die nur auf ihr Schul-Englisch zurückgreifen können, wird die große deutschsprachige Community sehr hilfreich sein. Da es sich um Software aus Deutschland handelt kann man sich auch zu 100% sicher sein, dass alles DSGVO-Konform von statten geht. Auch die Zahloptionen sind für den deutschen Markt.
Die Software gibt es als kostenlose Starter Edition und als Open Source-Variante im vollen Umfang kostenlos. Wer sich ein wenig auskennt mit der Einrichtung von Servern schonmal ein paar WordPress-Seiten manuell installiert hat (ohne 1-Click Installer), der kommt mit Community Edition sehr gut zu Recht. Leider gibt es für die kostenlosen Varianten keinen Herstellersupport. Man ist hier also auf sich alleine und auf die Google-Recherche gestellt.
Shopware bietet auch eine Cloud-Version an, hierbei muss man sich nur ein Benutzerkonto anlegen und sich nicht den Kopf über die Installation zerbrechen. Dann man aber auch keinen Zugriff auf den Quellcode und ist auf die Features angewiesen die es so out of the box gibt.
Wer doch den Support benötigt, für den wird es dann vergleichsweise mit den anderen E-Commerce Anbieter etwas teurer: 199,00 € mtl. Oder einmalig 2495€. Sehr sympathisch finde ich hier, dass den Anwendern die Wahl zwischen einem monatlicher oder einmaliger Zahlung gegeben wird. Abgesehen vom Herstellersupport bieten die bezahlten Versionen noch weitere Features wie erweiterte CMS-Funktionen und Verkaufskanäle. Mehr dazu hier: https://www.shopware.com/de/preise/.
Wichtig: Eine Provision pro verkauftem Artikel fällt hier nicht an!
Auch die Funktionalität und die Storefront (Oberfläche) von Shopware kann mit Hilfe von Plugins erweitert werden. Hierfür gibt es einen großen Marktplatz mit kostenlosen und kostenpflichtigen Plugins und Themes. Alle Plugins und Themes gibt es als Miet- und als Kaufversion. Diese Option sieht man sonst sehr selten und hat Sympathie-Punkte verdient.
Fazit: Shopware bietet mehr Lösungen als die Konkurrenz von Shopify an. Einen voll funktionsfähigen Shop kann man sich hier sogar schon kostenlos einrichten und kann bzgl. Der DSGVO beruhigt schlafen. Wem noch deutscher Support wichtig ist und bereit ist etwas mehr zu zahlen, der wird mit der Professional Edition voll auf seine Kosten kommen. Da der Sprung von 0€ in der Starter Edition auf die Professional Edition mit 200€ doch etwas groß ist, bekommt der deutsche Software leider einen kleinen Punkte-Abzug beim Preis.
Ein Aufsteigender Big-Player im E-Commerce-Bereich. Shopify hat das Prinzip von Woocommerce genommen und umgedreht.
Was heißt das? Shopify ist in erster Linie ein Content-Management-System das auf E-Commerce ausgelegt ist. Klar können damit auch Blog-Artikel angelegt werden. Jedoch wird es dem User in erster Linie sehr leicht gemacht seine Artikel anzulegen und zu verwalten.
Shopify gibt es nur in einem Abo Modell. Die Preise reichen von 29€ - 299€/ Monat. Wichtig zu wissen ist hier noch dass Transaktionsgebühren anfallen. Das bedeutet, dass bei jedem Verkauf zwischen 2% - 3-% des Umsatzes an Shopify abgegeben werden müssen.
Mit diesem Bezahlmodell ist die Plattform eher teuer. Dennoch ist sie sehr beliebt Mit einem Marktanteil von 31%. Woran liegt das?
Zunächst ist die Einrichtung eines Shops im Vergleich zu WooCommerce sehr einfach. Man erstellt ein Konto und kann mit der Einrichtung beginnen. Da es Shopify nur als gehostete Version gibt, fällt die Recherche zu dem passenden Hosting Provider weg - Eine Sorge weniger. Man muss sich nicht mehr um die Performance der Seite kümmern, da sich Shopify selbst um das CDN-Caching und sonstige perfomance-steigernde Einrichtungen kümmert. Im Prinzip kann man sich an der Seite anmelden, sich ein Theme aussuchen und anfangen zu verkaufen. Diese Einfachheit und Unkompliziertheit lässt sich der Anbieter eben bezahlen.
Das Prinzip der Plugins mit welchen die Grund-Funktionalität der Software erweitert werden kann hat Shopify von WordPress übernommen. Hier heißen sie jedoch nicht Plugins sondern Apps. Mit Hilfe von Apps können zum Beispiel Pop-Up Newsletter oder Banner zum Shop hinzugefügt werden. Hier gibt es kostenlose und kostenpflichtige Apps. Alle Apps sind ebenfalls nur einem Abo-Modell erhältlich.
Fazit: Wer eine einfache Plug-N-Play Lösung haben möchte und sich nicht lange mit technischem bla-bla auseinander setzen möchte, der ist mit diesem Anbieter sehr gut bedient. Aufgrund der großen und stark wachsenden Community gibt es schöne und ansprechende Themes, mit denen du deinen Online Shop individuell einrichten kannst. Wenn du bereit bist für den Komfort etwas mehr Geld auszugeben, dann bist du mit dieser Lösung gut beraten.
Liebe online shopperinnen und online shopper, bzw. Einzelhändlerinnen und Einzelhändler an euch richtet sich dieser Artikel schon eher.
Wir schreiben den 12.12 und zumindest in Baden Württemberg wurden die corona Maßnahmen heute wieder verschärft. Die Leute sollen nur raus wenn es absolut nötig ist. Unter diesen Regelungen leidet auch der Einzelhandel, was einige Einzelhändlerinne nun dazu treibt ihren Einzelhandel zu digitalisieren. E-Commerce ist das Stichwort.
Allerdings ist der Weg zum online ein technischer Hürdenlauf. Es gibt einige interessante Anbieter auf dem Markt. Speziell für Deutschland sind 3 Anbieter ganz besonders interessant, diese möchte hier etwas näher erläutern und für wen welcher Anbieter interessant werden könnte.
In dieser Reihe geht es um den Vergleich zwischen WooCommerce (WordPress Erweiterung), shopify und shopware.
WooCommerce
WooCommerce basiert auf dem Content Management System WordPress. Knapp 25% aller Webseiten des Internets basieren auf der WordPress Plattform. Ursprünglich wurde WordPress als Blogging-Plattform entwickelt. Die Kernfunktionalitäten des Systems können mit Plugins erweitert werden. Eines dieser Plugins ist WooCommerce.
Hiermit verwandelst du deine Webseite in Sekunden in einen Online-Shop. Mit Hilfe eines ansprechenden Themes hast du in Kürze und kostengünstig einen Online-Shop eingerichtet. Vorausgesetzt…
… Ja vorausgesetzt du hast schon etwas Erfahrung mit WordPress, denn die Bedienung ist leider nicht sehr intuitiv. Das ist dann wohl doch der Preis den man zahlen muss für eine solch kostengünstige Einrichtung eines Online-Shops.
Wer nicht vertraut ist mit dem Prinzip der Seiten und Beiträge im WordPress-Admin-Dashboard, dem kann alles sehr schnell über den Kopf wachsen.
Kleinere Anpassungen am Theme können sehr leicht im CSS Editor von WordPress vorgenommen werden. Wer jedoch Änderungen an der Struktur und dem Aufbau der Warenkorb-Seite beispielsweise vornehmen will, der sollte sich lieber einen Entwickler zu Rate ziehen. Scheinbar leichte Abänderungen setzen ein tiefergehendes Verständnis von der Verwendung von Child-Themes sowie PHP & CSS voraus.
Um WooCommerce zu betreiben, wird auf jeden Fall ein Hosting-Provider benötigt. Für kleinere Shops reichen Anbieter wie Strato noch aus. Da die Strato-Server aber nicht die schnellsten sind, sollte man sich bei wachsenden Anforderungen nach anderen Alternativen umschauen. Die Performance bzw. Schnelligkeit des Shops hängt also u.a. auch vom Hosting Provider ab. Andere Faktoren spielen bei der Performance jedoch auch noch eine Rolle. Darum muss man sich jedoch selbst kümmern. Beispiel: Mit CDN-Caching, JS & CSS Minifizierung kann die Seitenladezeit verbessert werden. Auch hierfür gibt es wieder (bezahlte) Plugins, oder man muss sich noch tiefer in die Untiefen der Technik einlesen.
Die Core-Funktionalität von WooCommerce selbst ist zwar kostenlos, jedoch lässt sich der Plugin-Hersteller gut bezahlen für alle weiteren Plugins die für das Betreiben eines Shops anfallen können. Daher mach dir vor der Installation am besten schonmal eine Liste mit allen Anforderungen die dein Shop haben soll (z.B. werden Artikel angeboten für die deine Kunden monatlich bezahlen sollen? etc.). Schaue dann auf Basis dieser Anforderungen nach, ob WooCommerce dem nachkommen kann, oder nicht doch kostenpflichtige Erweiterungen hinzukommen würden und ob ein alternativer Anbieter dann vielleicht doch die bessere Wahl wäre.
Fazit: WooCommerce ist eine kostengünstige beliebte und gut dokumentierte Variante für deinen Online-Shop. Ohne technisches Know-How würde ich jedoch nicht dazu raten einen Shop selbst einzurichten. Hier sollte ein Fachmann konsultiert werden.
We may request cookies to be set on your device. We use cookies to let us know when you visit our websites, how you interact with us, to enrich your user experience, and to customize your relationship with our website.
Click on the different category headings to find out more. You can also change some of your preferences. Note that blocking some types of cookies may impact your experience on our websites and the services we are able to offer.
Essential Website Cookies
These cookies are strictly necessary to provide you with services available through our website and to use some of its features.
Because these cookies are strictly necessary to deliver the website, refusing them will have impact how our site functions. You always can block or delete cookies by changing your browser settings and force blocking all cookies on this website. But this will always prompt you to accept/refuse cookies when revisiting our site.
We fully respect if you want to refuse cookies but to avoid asking you again and again kindly allow us to store a cookie for that. You are free to opt out any time or opt in for other cookies to get a better experience. If you refuse cookies we will remove all set cookies in our domain.
We provide you with a list of stored cookies on your computer in our domain so you can check what we stored. Due to security reasons we are not able to show or modify cookies from other domains. You can check these in your browser security settings.
Google Analytics Cookies
These cookies collect information that is used either in aggregate form to help us understand how our website is being used or how effective our marketing campaigns are, or to help us customize our website and application for you in order to enhance your experience.
If you do not want that we track your visit to our site you can disable tracking in your browser here:
Other external services
We also use different external services like Google Webfonts, Google Maps, and external Video providers. Since these providers may collect personal data like your IP address we allow you to block them here. Please be aware that this might heavily reduce the functionality and appearance of our site. Changes will take effect once you reload the page.
Google Webfont Settings:
Google Map Settings:
Google reCaptcha Settings:
Vimeo and Youtube video embeds:
Other cookies
The following cookies are also needed - You can choose if you want to allow them: