Creating a new shopify app

Introduction

For the last 4 months, I’ve been building a Shopify app. The app, called autobuzz, helps merchants schedule their product images to social media. The goal of the app is to make the lives of solo entrepreneurs easier.

Designed specifically for Shopify merchants, autobuzz streamlines the process of scheduling Instagram posts directly from your Shopify store. The primary benefit of using autobuzz lies in its automation capabilities. Merchants can create a post schedule, ensuring their Instagram feed remains active and engaging without the daily hassle. This not only saves time but also allows for consistent and strategic Instagram marketing for Shopify merchants.

Especially if you are building an e-commerce business by yourself or as a small team, you have to take care of and think about many things. Why not automate the tasks you can easily automate and focus on the core of your business?

Launch Announcement

I am thrilled to announce that autobuzz will officially launch its beta version in July! After months of hard work and dedication, the app is ready to help Shopify merchants elevate their Instagram marketing game. Initially, autobuzz will not be available in the Shopify app store. Instead, you can install it directly from the official website (link to be posted soon). Mark your calendars and be among the first to experience the power of autobuzz. Stay tuned for more updates as we approach the launch date, and get ready to revolutionize your social media management!

To stay updated and be the first to know about exclusive features, special offers, and tips on maximizing autobuzz, sign up for the newsletter. Subscribers will also receive early access to the app, ensuring you can start optimizing your Instagram posts as soon as the beta version is live. Don’t miss out on this opportunity to transform your social media strategy and streamline your e-commerce operations!

Features

Scheduling Posts

With autobuzz, scheduling Instagram posts has never been easier. The app allows Shopify merchants to plan and schedule their posts directly from their Shopify store. This means you can prepare your social media content in advance, ensuring a consistent and engaging presence on Instagram without the need for daily manual uploads. By automating the posting process, autobuzz helps you maintain a steady stream of content, which is crucial for building and retaining an active audience. Simply select the products you want to feature, set your preferred posting times, and let autobuzz handle the rest.

Custom Text Blocks

One of the standout features of autobuzz is the ability to create custom text blocks. Typically, merchants spend considerable time researching the best hashtags to use for their products. With autobuzz, you can save this set of researched hashtags as a text placeholder and reuse it for multiple posts. This feature allows you to craft reusable sets of text, such as captions, hashtags, or promotional messages, which can be easily inserted into your posts. For instance, you can create a text block with your favorite hashtags or a standard caption format, and use it across multiple posts with just a few clicks. This not only saves time but also ensures consistency in your messaging. Custom text blocks make it simple to keep your branding uniform and your audience engaged, without the repetitive task of typing out the same content for each post.

Conclusion

In summary, autobuzz offers a powerful solution for Shopify merchants looking to streamline their Instagram marketing efforts. By automating the scheduling of posts and allowing for the creation of custom text blocks, autobuzz saves you valuable time and ensures a consistent, engaging presence on social media. Whether you're a solo entrepreneur or part of a small team, autobuzz can help you focus on the core aspects of your business while maintaining an active and strategic Instagram profile.

Don’t let the daily grind of social media management hold you back. Embrace the future of Instagram marketing with autobuzz and watch your efficiency soar. Be one of the first to experience this game-changing tool by signing up for the beta version. Visit our website, subscribe to the newsletter for exclusive updates and early access, and get ready to revolutionize your Instagram marketing strategy. Your journey to effortless social media success starts now!

shopify invalid session token

Invalid session token - solve the annoying shopify error

If you have been working with shopify apps then you might have come across an error that says that you have an invalid session token. The reason behind this error might come from a race condition. The client tries to get some information from the server before it received a valid session token. Usually the client should have a session token, when making requests but you cannot be a 100% sure all of the time, thus the error is presented.

If you are making requests with axios then your request might look something like this:

// WRONG AND WIll LEAD TO ERROR DUE TO RACE CONDITIONS!!
axios
.get("https://test-application.test/api/endpoint")
.then(
    (response: {
        data: {
            content: string;
        };
    }) => {
            console.log("data:", data);
        );
    }
)
.catch((error) => {
    console.log("ERROR:", error);
});

In order to make sure that there won't be a race condition you can intercept your client's call and add some properties to the headers. All of this can be done very easily with axios. We want to make sure that the session token is always sent to the server, and in order to create a session token you will have to install an npm package from shopify.

You will need some methods from the shopify app-bridge-utils so make sure to install the npm package @shopify/app-bridge-utils:

npm i @shopify/app-bridge-utils
const instance = axios.create();
// Intercept all requests on this axios instance

instance.interceptors.request.use(function (config) {
return getSessionToken(app).then((token) => {
    config.headers["Authorization"] = `Bearer ${token}`;
        return config;
    });
});

instance
.get('https://test-application.test/api/endpoint')
.then(
    (response: {
        data: {
            themeName: string;
            appBlocksEnabled: string;
        };
    }) => {
        console.log("data:", data);
        setThemeName({ name: response.data.themeName });
        setContentLoaded(true);
        setSupportsAppBlocks(
            response.data.appBlocksEnabled === "partly" ||
                "completely"
                ? true
                : false
        );
    }
)
.catch((error) => {
    console.log("ERROR:", error);
});

And now your invalid session token error shouldn't appear anymore.

You can also watch my video right here:

Shopify Script tags conditional dispatching

Shopify 2.0 themes now offer the use of app blocks. If a theme is using app blocks, then your app shouldn't dispatch any script tags. Now if you're an laravel app developer you're probably using this laravel package from osiset.

Unfortunately this package does not yet provide the possibility to ask if app blocks are available or not. If you're using the package then script tags will always be dispatched. If you want need to load the script tags conditional, then you will have to do a little editing.

All of the code that I will show you here will work with the package at version 17.1. So you should make sure to upgrade your laravel package.

all credits of this code go to https://github.com/apurbajnu as he coded it you can also read along this GitHub Issue: https://github.com/osiset/laravel-shopify/issues/980#issuecomment-991649153. I just made some slide changes to make the code work with version 17.1

Also make sure to give your app the correct access scopes. In order to check for app blocks, you need to give your app the 'read_themes' scope!

  1. Go to the env file and add this line depending on whatever template you need.

2. Go to config/shopify-app.php and add this line.

3. Go to vendor/osiset/laravel-shopify/src/Contracts/ApiHelper.php and add these lines.

4. Go to vendor/osiset/laravel-shopify/src/Services/ApiHelper.php and add these lines. (carbon.now.sh won't let me copy such long lines of code, that's why this code looks a little ugly)

    public function getThemes(array $params = []): ResponseAccess
    {
        // Setup the params
        $reqParams = array_merge(
            [
                'limit' => 250,
                'fields' => 'id,role',
            ],
            $params
        );

        // Fire the request
        $response = $this->doRequest(
            ApiMethod::GET(),
            '/admin/themes.json',
            $reqParams
        );

        return $response['body']['themes'];
    }

    /**
     * {@inheritdoc}
     */


    public function scriptTagShouldBeEnabled(array $app_block_templates = [], array $params = []): bool
    {

        if (count($app_block_templates) > 0) {

            $themes = $this->getThemes();
            $published_theme = null;
            $templateJSONFiles = [];
            $sectionsWithAppBlock = [];
            $main = false;
            $templateMainSections = [];
            if (count($themes) !== 0) {
                foreach ($themes as $theme) {
                    if ($theme['role'] === 'main') {
                        $published_theme = $theme['id'];
                    }
                }
            }

            if (!is_null($published_theme)) {
                // Setup the params
                $reqParams = array_merge(
                    [
                        'fields' => 'key',
                    ],
                    $params
                );

                // Fire the request
                $response = $this->doRequest(
                    ApiMethod::GET(),
                    "/admin/themes/{$published_theme}/assets.json",
                    $reqParams
                );


                $assets = $response['body']['assets'];

                if (count($assets) > 0) {
                    foreach ($assets as $asset) {

                        foreach ($app_block_templates as $template) {

                            $trimmedTemplate = trim($template);

                            if ($asset['key'] === "templates/{$trimmedTemplate}.json") {

                                $templateJSONFiles[] = $asset['key'];
                            }
                        }
                    }

                    if (count($templateJSONFiles) == count($app_block_templates)) {
                        foreach ($templateJSONFiles as $file) {
                            $acceptsAppBlock = false;
                            $reqParams = array_merge(
                                [
                                    'fields' => 'value',
                                ],
                                ['asset[key]' => $file]
                            );

                            // Fire the request
                            $response = $this->doRequest(
                                ApiMethod::GET(),
                                "/admin/themes/{$published_theme}/assets.json",
                                $reqParams
                            );

                            $asset = $response['body']['asset'];

                            $json = json_decode($asset['value'], true);
                            $query = 'main-';

                            if (array_key_exists('sections', (array)$json) && count($json['sections']) > 0) {
                                foreach ($json['sections'] as $key => $value) {
                                    if ($key === 'main' || substr($value['type'], 0, strlen($query)) === $query) {
                                        $main = $value;
                                        break;
                                    }
                                }
                            }

                            if ($main) {
                                $mainType = $main['type'];
                                if (count($assets) > 0) {
                                    foreach ($assets as $asset) {
                                        if ($asset['key'] === "sections/{$mainType}.liquid") {
                                            $templateMainSections[] = $asset['key'];
                                        }
                                    }
                                }
                            }
                        }

                        if (count($templateMainSections) > 0) {
                            $templateMainSections = array_unique($templateMainSections);
                            foreach ($templateMainSections as $templateSection) {
                                $acceptsAppBlock = false;
                                $reqParams = array_merge(
                                    [
                                        'fields' => 'value',
                                    ],
                                    ['asset[key]' => $templateSection]
                                );

                                // Fire the request
                                $response = $this->doRequest(
                                    ApiMethod::GET(),
                                    "/admin/themes/{$published_theme}/assets.json",
                                    $reqParams
                                );
                                $asset = $response['body']['asset'];

                                $match = preg_match('/\{\%\s+schema\s+\%\}([\s\S]*?)\{\%\s+endschema\s+\%\}/m', $asset['value'], $matches);

                                $schema = json_decode($matches[1], true);

                                if ($schema && array_key_exists('blocks', $schema)) {
                                    foreach ($schema['blocks'] as $block) {
                                        if (array_key_exists('type', (array)$block) && $block['type'] === '@app') {
                                            $acceptsAppBlock = true;
                                        }
                                    }
                                    //   $acceptsAppBlock = .some((b => b.type === '@app'));
                                }
                                $acceptsAppBlock ? array_push($sectionsWithAppBlock, $templateSection) : null;
                            }
                        }
                    }


                    if (count($sectionsWithAppBlock) > 0  && count($sectionsWithAppBlock) === count($templateJSONFiles)) {
                        return false;
                    }

                    if (count($sectionsWithAppBlock) > 0) {
                        return false;
                    }
                }
            }
        }

        return true;
    }

6. Go To vendor/osiset/laravel-shopify/src/Actions/DispatchScripts.php and add these lines

so the __invoke Method at DispatchScripts.php should look something like this:

Now you need just need to make sure to override those classes in your project. Otherwise all your code will be overriden the next you update the package!

I hope this could help you a little bit when you build your shopify app!

5 great resources for Shopify app developers

5 great resources for Shopify app developers

In this article I want to share some resources that helped me develop a better understanding for developing apps or respectively building a micro Saas.

5. Shopify Github Projects

When I started out with my first app I just started coding right away without really thinking about best practices. I didn't know how Polaris is supposed to be used and their different components should work together. Of course there is a documentation, but that documentation didn't show me a whole page. They only show the code for a single component.

It was like an eye opener for me when I looked at their source code.

You can take a look at an example reviews app that they have created:

https://github.com/Shopify/product-reviews-sample-app/blob/main/pages/getting-started.js

They provide really clean and readable code. So you should definitely check that out!

4. OnlineBiz YouTube Channel

When you build an app you're not just building an app, you are actually building a business. You're building a Micro Saas. The first time I heard the term micro Saas was on this channel. And it changed the way I looked at building Shopify apps. I started to realize how hard it is to actually come up with an idea. And even if you have many app ideas then you should validate them and make sure that they are worth to invest some time in them.

I didn't know anything about validating app ideas until I watched their videos. There is a ton of knowledge for you to pick up if you are at a beginner level of building your business. And these guys know what they're talking about. They are the owners of ReConvert, a very popular Shopify app with over a million Dollars of yearly revenue.

I highly recommend to check out their channel:

https://www.youtube.com/channel/UCzcOcjcsrTEblPJavqr7R-w

3. Polaris Frontend Framework

My last point leads me directly to the Polaris Framework which is a great resource for Shopify app developers. But Polaris is kind of like a double sided sword. It will make your app look very shopify-ish (which is the goal of Polaris). So if you are building an app that is supposed to work with different Shopping Systems like WooCommerce, Magento, BigCommerce, etc. well then it can cause some confusion for the users.

Nonetheless you should still consider using it, since this will make your development speed so much faster. If you use their components then you don't have to think about color schemes, shadows, media query and all that stuff anymore. Everything is already done if you use it correctly.

Of course you could still use a library like bootstrap, but that will make your app look very generic if you don't customize it all.

Check out Polaris here and just give it a try:

https://polaris.shopify.com/components/get-started/

2. Polaris UI Kit for Figma

"The sooner you start coding, the longer your project", that is a quote I heard somewhere and I must say it is very true! If you don't plan or structure your project in any way then it will take forever. It is always advisable to start out with a basic layout of your app. If you're developing by yourself you can quickly see what layouts and components work well together. You will be able to quickly see if a layout is looking good or not. If you're working together with team mates, then you can quickly send them mock ups of your ideas and see how they like it. All without writing a single line of code.

There are design tools like Adobe XD, Sketch or Figma. Luckily Shopify provides us with all of their components for Figma. The best part is that it is all for free! All you have to do is create an account at Figma and duplicate the "Polaris for Admin" project which you can find here:

https://www.figma.com/community/file/930504625460155381

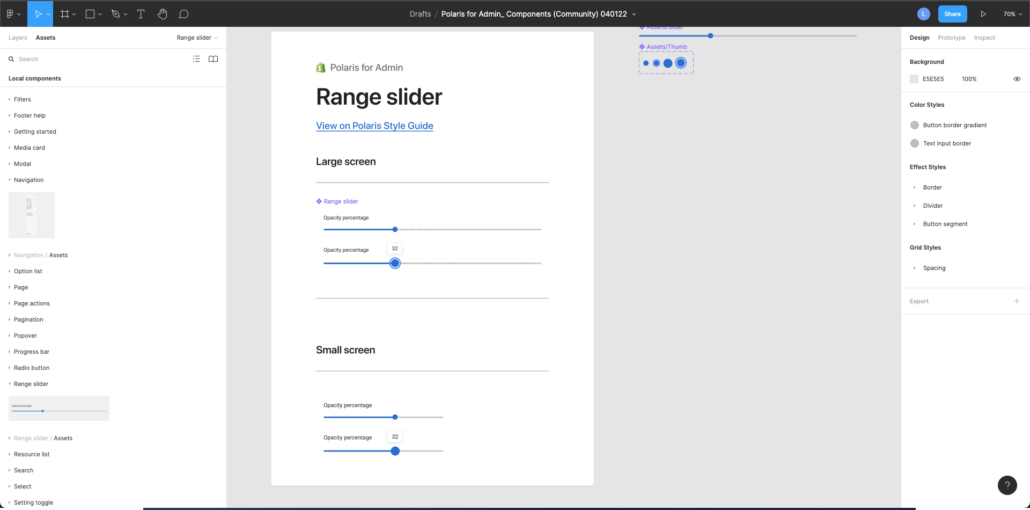
Now you will have all of the Polaris components at your disposal:

This will enable you to set up a layout very quickly. The best part is that you can adjust the components in the same ways as you can implement the later on. So you will have a very good overview of the capabilities of the components when building the layout.

I compared it to a dashboard UI Kit that I have bought on themeforest (This UI Kit came with Figma and React components as well). I wanted to compare it because honestly the Polaris Admin UI Kit looks very boring and not very modern. But unfortunately I was very disappointed by the UI Kit from themeforest. It looked great at first, but I had a hard time adjusting any components. It took me quite a while to adjust a component after a I changed a simple text. The components seemed to break as soon as I changed something in there.

Now I must say that I'm not an expert at Figma, I'm a developer. And that is exactly the power of Shopify's UI Kit. You can just open the file and start building good looking layouts without being a professional designer. That is the real power of it!

1. Preetam Nath Blog on micro Saas

One of the most valuable resources for me was the blog from an app developer named Preetam Nath. He is a very inspiring person and has a great blog! But what stood out the most for me was his post about Shopify micro Saas. He really goes into detail about finding an app idea. He shows you how to scan the market and how to find a profitable niche. This is really the first and most important thing that you should think about when you want to build your app.

As developers it is not very difficult for us to build Software, but the hard part is to build software that people really need and want! In his blog post Preetam goes deep into this topic and I highly recommend his content to you. He even provides you with a very valuable spreadsheet where you can take a look how he structures his notes.

Seeing this spreadsheet was a massive eye opener for me when I first saw it. I also realized that building an app requires a lot more preparation than I have imagined.

https://www.preetamnath.com/blog/shopify-micro-saas

Final thoughts

Hopefully you found some good and helpful resources for yourself and your business. I like to share everything that was helpful for me, because I believe that if it helped me, then there will be at least one person out there that will find it just as helpful and maybe that person is you who is reading this text right now ;)

Shameless plug:

I also have a YouTube channel where I talk a about Shopify app development. That might also be a great resource for you!

Check it out right here:

https://www.youtube.com/channel/L4Webdesign

How to create a shopify app in 2022

How to create a shopify app in 2022

Shopify made in incredibly easy for you to create a shopify app in 2022. All you have to do is update your shopify cli and run the latest version. You can checkout you shopify CLI version by typing in shopify version in your terminal. If you run version 2.7.3 or higher then you can be sure that the shopify app CLI is available to you.

Now cd into the directory where you want to install your app. Now just type in

this will create a new laravel project. Shopify also provides the ability to create a node.js project or a ruby project right from the CLI!

You might think that you can instantly open your app by typing in shopify app open. But unfortunately that won't work yet. Some configuration is still necessary.

First you have to make sure that your ngrok connection is authenticated. So you will have to create an account and open your dashboard at ngrok. In there you can navigate to your Auth token and copy that value.

Now go back to your terminal and type in

Now your ngrok connection is authenticated. Your shopify application needs ngrok to connect to your shop. Now you can start your app by typing in

This command will automatically start a new tunnel via ngrok and start a local development server.

The CLI will ask you if you want to update your application url. If you have no other reason why you shouldn't update your app url, then click yes.

This step is important, because every time you restart your application you will get a new ngrok-url. This means your local application is now reachable under a new url. That's why you would have to update your app url in your partners dashboard again. But the shopify CLI will do that for you automatically.

Your terminal should now look something like this:

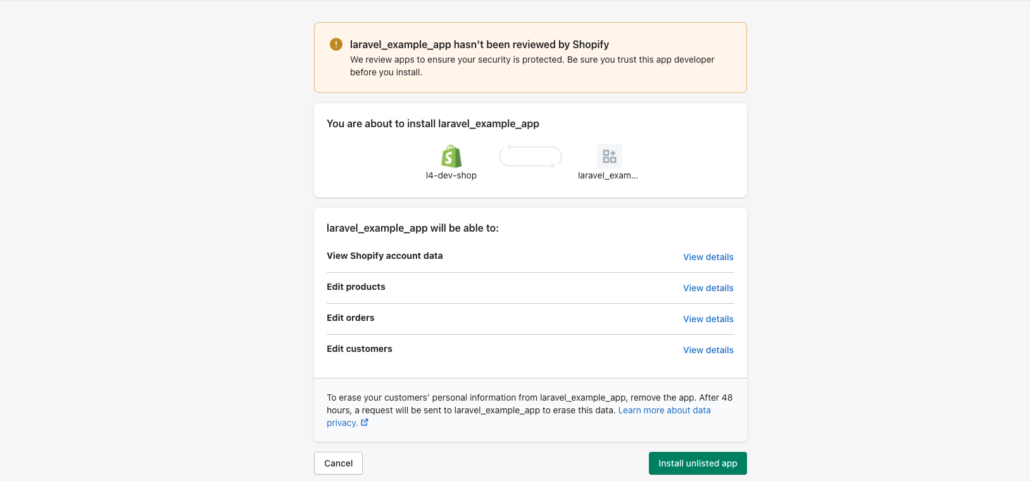
If you press command or ctrl and click on the link in the console then you will be taken to installation window of shopify. That page will look something like this:

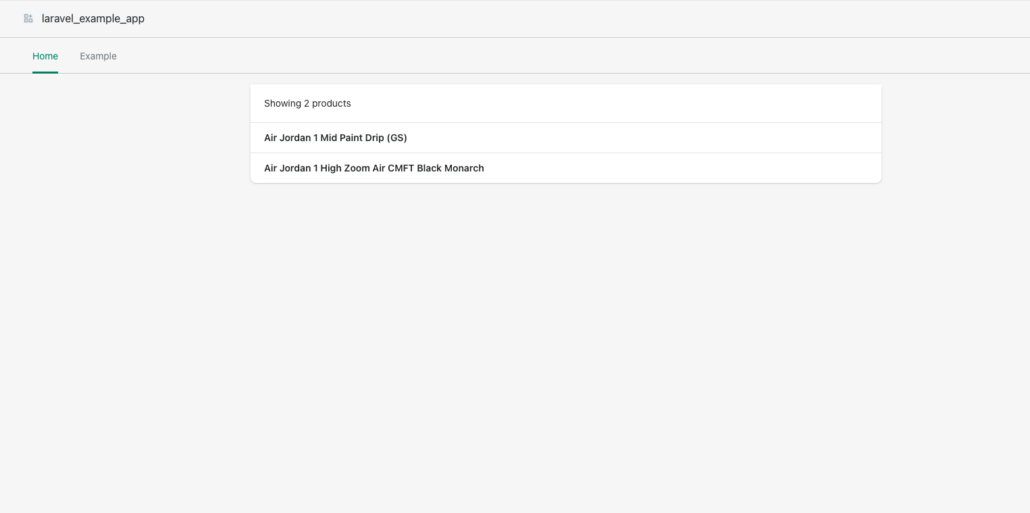
If you click on install unlisted app then you should see something like this:

Congrats! You just created a shopify app in a matter of minutes.